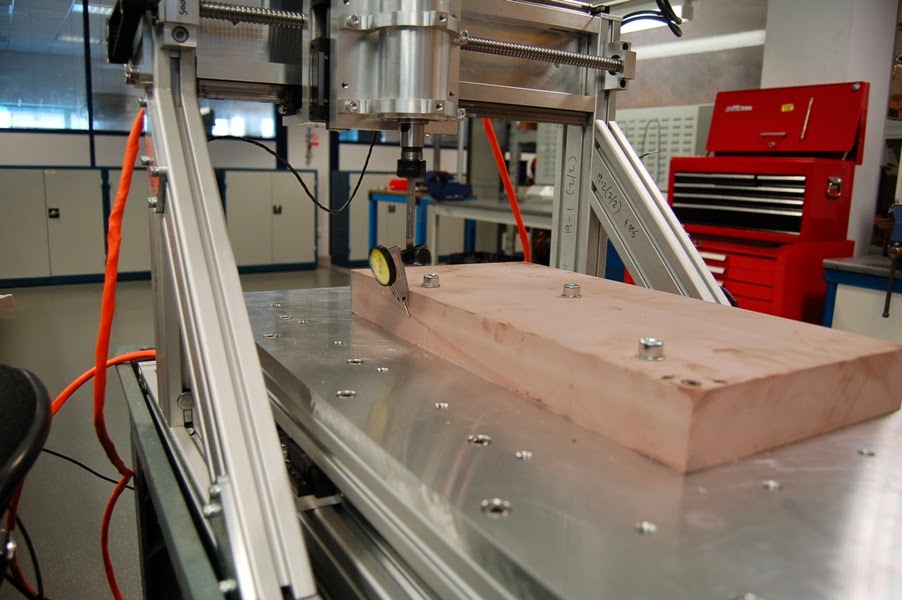
A bumper update of photos this week! Recent progress has been centred around starting the composite work for the intake manifold. To this end, I have finally plucked up the courage to run my milling machine in anger. I have started by cutting the plug for the intake runner (1 per engine
cylinder) from polyurethane tooling board which is quite a nice material that machines like a block of car body filler (Bondo to subscribers across the pond). A rough and finish path on either side of the block then it is a simple matter of cutting the supports away and cleaning up the stub left over.
This is a 2-sided part so alignment of the block to the machine is critical. This ensures that both tool paths line up when the part is broken out of the block. To this end, I used a finger clock to align the long axis of the part with the x-axis of the machine. Not an easy task given the less than ideal surface along this face!
I could then use an edge finder to zero the machine on the appropriate corner of the block
A rough pass saw the part taking shape
Finishing the first side, then roughing and finishing the second side (after repeating the alignment procedure) yielded a part ready to break out of the block. The more astute amongst you will notice the patches of lighter coloured material. During machining, the Z-axis (spindle up and down) come loose on me due to poor pulley alignment, causing the z-axis to loose its location. Fortunately, a bit of car body filler and locally running the finishing path allowed me to recover the part.
There is a 'pencil cleanup' option in the tool path generation software that supposedly would allow the machine to cut the part away from its supports, but I chose to do this manually on this occasion until I have a bit more confidence on using this option. I didn't want to write off a few hours of work at this point! I used a burr bit in a dremel to remove the supports and a quick clean up with 120 grit paper and I had the makings of my runner plug
Once machined, I had to apply the top coat to the plug in order to arrive a finish that could take a polish. This is not strictly necessary on this part since the down stream processes are unlikely to reproduce the finish exactly, but I felt it would be good practice in using the materials and techniques.
The finish comprises a couple of coats of tooling resin which is a 2-part coating that cures to a hard finish suitable for polishing. It is applied by brush (or spray if available), then cut back with progressively finer grades of wet and dry paper, ending in 1500 grit. I used black guide coat to ensure I had passed over the entire surface with each grade. The screws in the ends simply allow me to hang the part when the various layers a drying.
Then a switch to poilishing compound and a few coats of mould release wax for good measure.
With all of the master pattern finishing complete, I could turn my attention to the plaster mould. The split line on the part is particularly challenging as it is curved in two directions and since I was using a semi-hard tool, I would need to replicate it quite accurately, otherwise I would lock the part in one half of the tool. I finally figured out I could create a 3D CAD model of the required split line, then flatten it to provide a pattern which I could use to cut out pieces of thin styrene sheet.
This was flexible enough to form along either side of the plug, which would then guide the application of plasticine to form the sacrificial tool face. The remaining plasticine structure was formed and a number of domes were located to provide tool half to tool half alignment
. I could then form the shuttering around the part and pour the plaster.
Once cured, The shuttering and plasticine was removed, then the plaster trimmed back and cleaned up. Half way there!
From here, I will need to apply a release agent to prevent the other half from attaching itself during curing, rebuild the shuttering, then pour the second half of the tool. This will take a week or so to dry fully before I can use it in anger to make my wax plugs.
In the mean time, I have completed a couple of small jobs for the car itself – I have finally terminated the fuel lines with appropriate
fittings. This involves a compression fitting on the pipe itself, which presents an ‘AN dash 6’ female thread, which in turn is converted to a typical push fit fuel line connector (with the red caps / masking tape plugs in the pictures). From here, I will need to make up the flexible lines, but they will have to wait until the body is installed.


